

Introducing children to the wonders of the night sky can be an enchanting and educational experience. Astronomy, with its vast celestial expanse, provides a unique opportunity for kids to explore the mysteries of the universe in a hands-on and engaging way. This article discusses various easy astronomy projects for kids that fuel their curiosity and nurture a love for learning about the cosmos.
Our mission is to provide parents, educators, and young stargazers with a comprehensive guide to simple yet captivating astronomy projects that make learning about the universe a delight. The design of each project aims to blend educational value and creative fun, ranging from stargazing basics to creating cosmic art.
Embark on a journey through the following sections as we explore astronomy projects for kids, like crafting a star wheel, experiencing the thrill of a DIY rocket launch, and creating an otherworldly sensory bin.
Let’s dive into the cosmos together and discover the universe through exciting and educational activities for kids.
Table of Content
- Stargazing Basics: Create a Star Wheel
- Moon Phases Model: Oreo Cookies Delight
- Solar System Mobile: A Cosmic Display
- Build a Telescope: A DIY Exploration Tool
- Constellation Art: Connect the Dots in the Sky
- Alien Planet: Imaginative Exoplanet Exploration
1. Stargazing Basics: Create a Star Wheel
The first step in introducing astronomy to kids is familiarizing them with the night sky. A star wheel, a planisphere, is a simple and effective tool. Using a printable template or creating one from scratch, kids can cut out a circular piece of paper and attach it to a second, slightly larger circle.
By aligning the inner and outer circles based on the date and time, children can quickly identify constellations and stars visible in their location.
Materials Needed
- Printable star wheel template or blank paper
- Circular object for tracing (e.g., a plate)
- Scissors
- Brass fastener
- Pencil
- Compass (optional)
- Hole punch (optional)
Procedure
Step 1: Obtain a Template or Create a Blank Circle
Start by printing a star wheel template available online or drawing a blank circle on paper using a circular object as a guide.
Step 2: Cut Out the Circles
This instruction guides you to proceed to the second step, which involves cutting out a circle along the lines that have been drawn or printed. This circular cutout will serve as the base for the star wheel.
Step 3: Identify the Center
Find the circle’s center using a compass to draw or estimate intersecting lines visually.
Step 4: Create an Inner Circle
This instruction directs you to draw a circle slightly smaller than the larger circle, positioning it near the center—the smaller circle functions as the rotating disk of the star wheel.
Step 5: Label the Star Wheel
Divide the outer circle into 12 sections, each representing one month of the year. Label these sections with the names of the months.
Step 6: Label the Inner Circle
Label the inner circle with the cardinal directions: North, South, East, and West.
Step 7: Add Constellations and Stars
Using a star chart or a guide, add the names of significant constellations around the outer circle, aligning them with the corresponding months.
Step 8: Attach the Inner and Outer Circles
Poke a small hole at the center of both circles. A brass fastener attaches the inner circle to the outer circle, allowing it to rotate freely.
Step 9: Set the Date and Time
To use the star wheel, align the current date on the outer circle with the time on the inner circle. This configuration provides a window into the night sky for that specific moment.
Step 10: Test and Observe
Encourage kids to test their star wheel by adjusting the date and time settings. As they rotate the inner circle, they will notice how the constellations shift in the night sky, providing an interactive and educational experience.
Educational Value: The star wheel introduces kids to the concept of the night sky’s changing appearance throughout the year. Children learn how celestial objects move across the sky by aligning the star wheel to the current date and time. This project lays the foundation for future stargazing activities.
2. Moon Phases Model: Oreo Cookie Delight

Understanding the moon’s phases can be deliciously fun with the Oreo Cookie Moon Phases model. Grab a pack of Oreo cookies. Let the kids observe and replicate the various lunar phases by carefully scraping off the cream filling to represent each stage. This tasty and interactive activity makes learning about the moon’s cycles enjoyable and provides a tasty treat afterward.
Materials Needed
- Oreo cookies (or similar cream-filled sandwich cookies)
- Small plate or surface for arrangement
- Plastic knife or spoon
- Moon phases diagram or reference
Procedure
Step 1: Gather Materials
Ensure you have enough Oreos for each phase of the moon, a small plate for arranging them, and a plastic knife or spoon for scraping.
Step 2: Introduction to Moon Phases
Briefly explain the concept of moon phases to the kids. Use a moon phases diagram or reference to illustrate the different stages, including the new moon, waxing crescent, first quarter, waxing gibbous, full moon, waning gibbous, last quarter, and waning crescent.
Step 3: Start with the New Moon.
Start the activity by showing a complete Oreo cookie, symbolizing the “new moon.” The cookies illustrate the moon in a not visible phase from Earth.
Step 4: Wax On – Waxing Crescent
Using the plastic knife or spoon, meticulously remove a small section of the cream from one side of the cookie, creating a crescent shape.
Step 5: First Quarter
During the first quarter, scrape half of the cream from the cookie to represent the moon’s position when illuminated one-quarter.
Step 6: Waxing Gibbous
Continue scraping more cream from the cookie, leaving a more significant illuminated portion. The cookie represents the waxing gibbous phase.
Step 7: Full Moon
Present a complete Oreo cookie as the full moon, illuminating its entire face.
Step 8: Waning Gibbous
Start reversing the process by scraping cream away from the other side of the cookie, creating a waning gibbous shape.
Step 9: Waxing Crescent
Remove half of the cream from the opposite side of the waxing crescent phase for the last quarter.
Step 10: Waning Crescent
Finish the activity by scraping a small portion of cream from the last remaining side of the cookie, forming the waning crescent.
Step 11: Discuss and Enjoy
They were engaging in a discussion about the moon phases, asking kids to observe and explain the changes they made to the cookies. Finally, let them enjoy their moon phase creations as a tasty reward.
Educational Value: The Oreo Cookie Moon Phases model combines kinesthetic learning with a delicious incentive. Through this project, children visually represent the moon’s different phases and gain a hands-on understanding of the moon’s changing appearance in the night sky. Plus, the tasty conclusion adds an element of fun to the learning process, making astronomy a memorable and enjoyable experience for young minds.
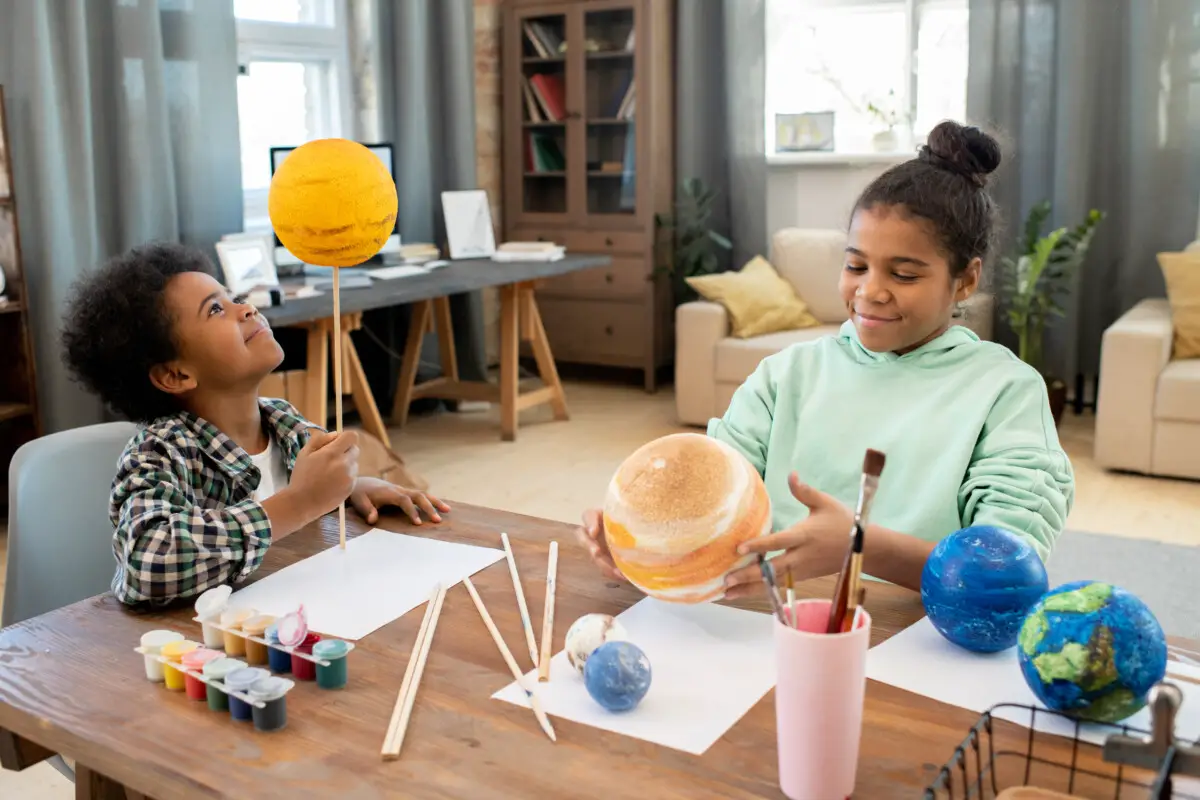
3. Solar System Mobile: A Cosmic Display
Crafting a mobile solar system allows kids to learn about the order and relative sizes of planets in our cosmic neighborhood. Children can create a visually appealing mobile that accurately represents the arrangement of planets around the sun using various craft materials, such as foam balls, paint, and string. This hands-on project enhances spatial awareness while also fostering creativity.
Materials Needed
- Styrofoam balls or wooden craft balls in various sizes
- Acrylic paint or markers
- Paintbrushes
- String or fishing line
- Wooden dowel or wire coat hanger
- Glue
- Hole punch
- Solar system reference for accuracy
Procedure
Step 1: Research and Reference Begin the project by exploring the solar system with the kids. Discuss the planets’ names, sizes, and order, emphasizing their distinct characteristics. Use a solar system reference to ensure accuracy in representation.
Step 2: Paint the Planets. Provide each child with Styrofoam or wooden balls representing the planets. Using acrylic paint or markers, encourage them to color the balls to match the appearance of each planet. To add realism, discuss distinctive features, such as Jupiter’s bands or Saturn’s rings.
Step 3: Allow the Planets to Dry. After painting the planets, set them aside to dry thoroughly. This step encourages kids to practice patience and builds anticipation for the assembly phase.
Step 4: Create Hanging Strings Cut pieces of string or fishing line to varying lengths, corresponding to the distances of each planet from the sun. This step introduces a spatial element to the project, emphasizing the planets’ positions in the solar system.
Step 5: Attach Planets to Strings Using glue, attach each planet to its designated string. Ensure the planets are evenly spaced along the strings to maintain a balanced appearance in the mobile.
Step 6: Prepare the Mobile Frame. To create the mobile frame:
- Use a wooden dowel or repurpose a wire coat hanger.
- Shape the hanger into a circular or spiral form, providing multiple attachment points for the planetary strings.
- If using a dowel, ensure it is long enough to accommodate the lengths of the hanging strings.
Step 7: Attach Planets to the Mobile Frame. Punch holes near the top of each planet and thread the strings through these holes. Tie secure knots to keep the planets in place. Attach the other ends of the strings to the mobile frame at varying heights, creating a visually appealing representation of the solar system.
Step 8: Hang and Observe. Suspend the solar system mobile from a ceiling hook or any elevated surface. Encourage kids to observe their creations and discuss the relative positions of the planets. This step reinforces spatial concepts and provides a tangible representation of the vastness of our solar system.
Educational Value: The solar system mobile project offers a multi-faceted learning experience. Children engage with the artistic aspect of painting and crafting and better understand the planets’ order and distances from the sun. The spatial arrangement of the mobile reinforces the concept of scale in the solar system, fostering a more profound appreciation for the vast distances between celestial bodies.
4. Build a Telescope: A DIY Exploration Tool
Constructing a simple telescope at home can be a thrilling experience for kids eager to explore distant celestial bodies. Kids can fashion their basic telescope with readily available materials like cardboard tubes, lenses, and duct tape. This project introduces them to the principles of optics and allows for practical observation of the moon, planets, and stars.
Materials Needed
- Two cardboard tubes (one more prolonged, one shorter)
- Magnifying lenses (plastic or glass)
- Duct tape or masking tape
- Craft knife or scissors
- Ruler
- Pencil
- Decorative materials (optional)
Procedure
Step 1 – Gather Materials
Ensure you have all the materials ready, including cardboard tubes, magnifying lenses, tape, a craft knife or scissors, a ruler, and a pencil.
Step 2: Measure and Cut Measure and mark the midpoint of the longer cardboard tube. Carefully cut the tube in half, creating two equal-length sections. These will form the main body of the telescope.
Step 3: Create the Focusing Mechanism On one end of the longer tube, cut four evenly spaced slits about 1 inch long. Fold these slits outward to create a flared section. Insert the shorter tube into these flaps to create a focusing mechanism. The shorter tube can be adjusted in and out to achieve focus.
Step 4: Attach the Magnifying Lens Securely tape a magnifying lens to the open end of the longer tube. This lens will serve as the objective lens, collecting and focusing light.
Step 5: Decorate (Optional). Encourage creativity by allowing kids to decorate their telescopes with colorful materials, stickers, or paint. Personalizing their creation adds an extra layer of engagement to the project.
Step 6: Extend the Tube (Optional). If desired, attach additional cardboard sections to extend the length of the telescope. This modification can enhance magnification, allowing for clearer views of celestial objects.
Step 7: Test and Adjust Take the DIY telescope outside during the evening or at night. Aim it at the moon, stars, or distant terrestrial objects. Adjust the length of the shorter tube to achieve focus and encourage kids to observe and explore the wonders of the night sky.
Step 8: Discuss Observations Engage in a discussion about what the children observe through their homemade telescope. Encourage them to share their findings, ask questions, and explore the concepts of magnification and light gathering.
Educational Value: Building a DIY telescope provides a hands-on experience that introduces children to the basic principles of optics and astronomy.
Children learn how telescopes gather and manipulate light to create clear images by constructing the focusing mechanism and attaching a magnifying lens.
The interactive nature of this project fosters a sense of curiosity and exploration, encouraging children to participate actively in stargazing and celestial observation.
This DIY telescope is a valuable tool for nurturing an early interest in astronomy and sparking a sense of wonder about the vastness of the universe.
5. Constellation Art: Connect the Dots in the Sky
Transforming the night sky into an art canvas, kids can create their constellations using black paper, glow-in-the-dark paint, and a star chart as a guide.
This creative art project encourages children to identify and understand constellations. It reinforces their fine motor skills as they connect the dots to form stellar patterns. The finished artwork can be a captivating bedroom decoration that glows in the dark.
Materials Needed
- Black construction paper or cardstock
- Glow-in-the-dark paint or markers
- Star chart or constellation guide
- Pencil
- White chalk or colored chalk (optional)
Procedure
Step 1: Gather Materials
Ensure you have all the necessary materials, including black construction paper, glow-in-the-dark paint or markers, a star chart or constellation guide, a pencil, and white chalk (optional).
Step 2: Choose Constellations
Select a few constellations that are easily recognizable and have distinct patterns. Common choices include the Big Dipper, Orion, and Cassiopeia.
Step 3: Plan Layout
Using a pencil, lightly sketch the layout of the chosen constellations on black construction paper. Consider the size of the paper and the placement of each constellation.
Step 4: Connect the Dots
Mark the stars of each constellation with dots on the paper. Connect these dots with glow-in-the-dark paint or markers to form the shapes of the constellations. Encourage kids to be creative with the sizes and spacing of the dots.
Step 5: Add Additional Elements (Optional)
Use white chalk to add stars and other celestial elements to the background for an extra touch. This step can enhance the overall appearance of the artwork and create a more immersive representation of the night sky.
Step 6: Let it Glow
Allow the glow-in-the-dark paint or markers to dry completely. Once dry, turn off the lights and witness the constellations glowing in the dark. This step adds a magical and captivating element to the artwork.
Step 7: Discuss Constellations
Engage in a discussion about the constellations chosen for the project. Share interesting facts about each constellation, such as their mythology or prominent features. Encourage children to ask questions and explore the stories behind the stars.
Step 8: Display and Enjoy
Display the finished constellation art in a darkened room to fully appreciate the glow-in-the-dark effect. This artwork can serve as a unique and captivating decoration, creating a celestial atmosphere that sparks curiosity about the wonders of the night sky.
Educational Value: Constellation Art combines artistic expression with astronomy, offering kids a creative way to connect with the night sky. This project not only reinforces the identification of constellations but also provides an opportunity to explore the cultural and historical significance behind these stellar patterns. As children connect the dots to form constellations, they enhance their fine motor skills and gain a deeper understanding of the celestial wonders that have captivated humans for centuries.
6. Alien Planet: Imaginative Exoplanet Exploration
Encourage creativity by having kids design and craft their alien planet. This project combines scientific knowledge with imaginative play as children consider their unique celestial body’s atmospheric conditions, landscapes, and inhabitants.
They can bring their extraterrestrial visions to life using clay, paint, and other craft supplies, fostering a blend of scientific curiosity and artistic expression.
Materials Needed
- Modeling clay or playdough in various colors
- Craft paper
- Markers
- Pipe cleaners
- Googly eyes
- Small beads or sequins
- Glue
- Scissors
- Plastic or styrofoam base (optional)
Procedure
Step 1: Introduce Exoplanets
Begin the project by discussing exoplanets, planets that orbit stars outside our solar system. Explain that scientists discover these distant worlds using telescopes and share fascinating facts about exoplanets.
Step 2: Brainstorming
Encourage children to let their imaginations run wild while brainstorming ideas for their alien planets. Ask questions about the planet’s atmosphere, climate, and the types of creatures that might inhabit it.
Step 3: Create the Planet’s Surface
Using modeling clay or playdough, mold the surface of the alien planet. Children can experiment with different textures and colors to represent unique landscapes, such as mountains, valleys, or alien flora.
Step 4: Craft Alien Creatures
Let creativity flourish by crafting alien creatures that could inhabit the newly designed planet. Use pipe cleaners, googly eyes, beads, and other materials to bring these imaginative beings to life. Discuss with children how the creatures might adapt to the conditions on their planet.
Step 5: Design the Atmosphere
Design a craft paper backdrop or base to represent the alien planet’s atmosphere. Use markers to illustrate swirling gases, unusual clouds, or other atmospheric features. Attach this backdrop to a plastic or styrofoam base for stability.
Step 6: Assemble the Scene
Place the molded planet surface on top of the atmosphere backdrop. Arrange the crafted alien creatures on the planet’s surface to create a vibrant and lively scene.
Step 7: Discuss and Imagine
Engage in a discussion about the features of each child’s alien planet. Please encourage them to share their creative choices, explaining the planet’s characteristics, its inhabitants, and any unique elements they incorporated into their designs.
Step 8: Display the Alien Planets
Display the finished alien planets in a designated space, creating a mini-exoplanet exhibition. This step showcases the children’s creativity and allows them to appreciate the diverse and imaginative worlds their peers have crafted.
Educational Value: The Alien Planet project seamlessly blends science and art, fostering a multidimensional approach to learning. Children engage with scientific concepts related to exoplanets and cultivate their creativity by envisioning and crafting entirely new worlds. This project encourages critical thinking as kids consider the environmental conditions necessary for life on their alien planets.
Conclusion
Incorporating easy astronomy projects into a child’s learning journey can ignite a lifelong passion for science and exploration. From constructing telescopes to crafting alien planets, these hands-on activities not only make complex astronomical concepts accessible but also promote creativity and critical thinking.
Kids learn about the universe’s wonders and develop valuable skills beyond astronomy by engaging in these projects.